You will also want to view the Assembly Instructions. See the links page as well for some places to get
parts and design inspiration. Other saber-builders have
e-mailed alternative suggestions for these items, and I have
put such information in the Assembly
Instructions pages—so read this list and those pages before
you begin shopping or construction. (You may also want to
examine the visitor-supplied
graphics and miscellaneous
pages.)
Parts — If you use exactly
what I did, you will need:
- (1) chrome tube or pipe, approximately 12" in length,
roughly 1 1/4" outside diameter. I used an extra canister
vacuum cleaner attachment tube. (Estimated cost to purchase
chrome pipe is $10 to $15.) Do not confuse the chrome tube
with a vacuum tube (below).
Paul has
suggested: “instead of buying an expensive piece of chrome
tubing, go to a bike shop (I’m lucky I have a friend who owns
one) and buy a long seat post (that thing that holds your
seat on the bike). It costs about $5.00 (if you get a cheap
one).”
- (1) PVC coupler, 1 1/4" inside diameter by 2" long,
normally found in the electrical conduit section. (About
$0.65.)
- (1) PVC end cap, found in the PVC plumbing section, 1
1/4" inside diameter by about 1 1/4" in length. (About
$0.65.)
- (1) 1/2-pint gloss black multi-purpose latex paint. A
small can is fine; essentially you want a can big enough to
dip completely the PVC pieces (electrical PVC is dark gray;
plumbing PVC is white). ($4.00)
- 36" worth, more or less, of 1/2" wide by 5/16" thick
rubber high-density foam weather-strip (self-sticking). (A
10-foot roll costs $2.19.) You can also buy replicas of the
type of grip used in the film at Yoda’s
House.
- (1) “D”-ring ($0.32)
- Hardware to connect the D-ring. (I couldn’t find a D-ring
that had a connector already on it, although these
exist—try a shop that carries marine hardware.) There is
plenty of room here for interpretation. Essentially you
want to mount the D-ring on the “base” of the saber. (See
the Assembly Instructions
for some alternative suggestions.) Here’s what I used:
- (2) eye bolts, 8-32 by 1/2" (or more; you can cut
them off if they are too long). ($0.19 each)
- (2) plastic-lined locking nuts to fit those ($0.32
each)
- (2) 8-32 hexagonal nuts (for inside) ($0.05 each)
- (2) regular washers (for inside) ($0.05 each)
- (2) lock washers (for inside) ($0.05 each)
- (1) fender washer, about 1 1/16" outside diameter
(optional)
- (1) electron tube (or vacuum tube), 1 1/16" outside
diameter. This will be internal but visible, and forms the
“emitter.” (This is not necessary, but it worked great for
me.) Electron tubes (for those of you who, like me, grew up
in the age of electronics) were used in radios,
televisions, and so on before transistors were invented.
You can probably find one somewhere, although it is even
possible to order them from Radio Shack. Mine is an RCA
tube of some type, probably a diode or triode (no, I can’t
tell you for sure—I should have noted the number before
trashing the base). (Free for me; new is about $6.95.)
Because of its diameter, I had to remove the plastic base
and metal connector pins from mine—after 40 years or more,
this was not a problem, as the plastic had become quite
brittle. Remember this piece is there just to look
good; it doesn’t do anything—it is
not part of the electronic circuit. For
this reason, the tube you use does not even need to be
functional or in good condition.
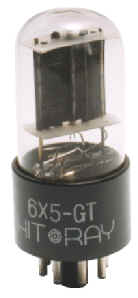
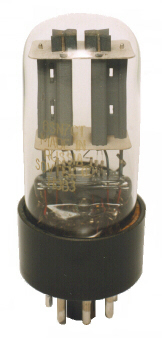
These are a Hit Ray 6X5-GT (on the left), and a Sovtek 6SN7 (on the right). Both are almost
exactly like the tube I used. (on the left), and a Sovtek 6SN7 (on the right). Both are almost
exactly like the tube I used. You can get these from The Tube
Store, or your local Radio Shack.
Note that this tube does not have any “getter”—a silver coating
inside the top of the tube. Whatever you end up with, the lack
of the “getter” is important.
This came in via e-mail from Byron Fast, at The Tube
Store.
Hello!
I’m one of the guys that runs
thetubestore.com, and we noticed your link and our tube image
a while back. The traffic from the link kept growing, and now
we're sold out of 6X5-GTs! Most people that want to build
your light saber can't buy from us (because we have a $20
minimum order), but some have definitely found us from your
site.
I just wanted to thank you for the link
and let you know that the tube is gone from our stock and
won't be coming back any time soon, so you may want to
recommend a similar tube from our site that works well for
Jedi knights. (Unfortunately, a good one like the GE 8417 is
$80 a pair).We of course also have many used tubes that may
function well, which we would usually sell for about $2.50,
and we will ship an order of less than $20 for those willing
to pay an extra $2.50 handling fee. Since I'm sure you get
lots of emails about this, maybe this info will help other
people build your saber.
And later …
I’ve got the perfect option: the Sovtek 6SN7. It’s got no getter, it’s the
same price and size, and we’ve got lots of them. You can nab
the picture again if you like.
- (2) Decorative (nickel-plated) caps, found in the
lighting and fan department. These are normally used to
secure shades on ceiling-mounted incandescent lighting
fixtures. The ones I used are manufactured by the Angelo
Brothers Company, and were found at a hardware store. The
package reads “Two Fixture Caps, Tapped 1/8-IP, Nickel
Plated” and had the number 70640 on it. ($0.98)
- (1) length of threaded tube to fit the caps above, also
used for lighting fixtures. (I happened to have a piece of
this.) ($1.50)
- (1) ancient calculator display set of magnifying bubbles.
(I have no idea why I actually saved one of these, but I’m
glad I did, as this is exactly what was used for the first
few light saber props built for Star Wars.) I’ve
heard you can get these remanufactured from props dealers.
You might also use a 10-LED “power bar” display, available
from Radio Shack for about $4.00.
Old-style (1970s) calculator display
bubbles—I have no
idea why I saved one of these, but I’m glad I did.
If you can’t find these, here is an alternate suggestion
sent in by Padme:
I just thought I’d tell you that I couldn't find the
calculator bubbles you referred to. So instead, I used four
clear square rubber furniture feet. I epoxied them on the
slice in the metal and they make a cool prism effect when
light shines thru them.
And … Mor Ja-Ditom
obtained good results using a clear Lego brick.
- Various small machine screws. (Radio Shack has an
assortment for $1.50—but be careful; the ones I bought from
Radio Shack were easy to break while screwing through the
metal, even though I’d drilled pilot holes.)
- Epoxy. (Note: Epoxy goes bad if it gets too
old—it loses its adhesive properties—so you’ll want a fresh
batch if yours is more than a years or so old.)
Optional Parts — If you want
to add a light inside, as I did, consider using the
following:
The light inside is mounted just “south of” the calculator
display bubbles. The LED I’ve used lights up the magnifying
bubbles quite well, and backlights the vacuum tube, for a very
nice effect.
- (1) Extra-bright (1200 MCDs) large LED, rated for 2.7
volts. They come in clear, red, orange, yellow, and green.
I used orange, but you needn’t. (Blue LEDs are not
generally available; it was only recently that a method of
“doping” the semiconductor filament was developed to allow
blue LEDs to be manufactured. ($4.00) You could use just
about any light source if a big LED is unavailable or you
have 3-volt lamps already about. I chose an LED because of
its low battery consumption and greater durability compared
to an incandescent.
- (1) AAA-size battery holder ($1.00)
- (1) SPST (single pole, single throw) subminiature switch
($2.79)
- (2) AAA batteries; 1.5V each. ($2.50)
- (1) Small spool of stranded electronics wire (you only
need about 12" worth); I dug mine out of the aforementioned
junk boxes.
- Something to mount the LED or light bulb. (See the Assembly Instructions for more
information.)
Tools — required or recommended:
- Hack saw or band saw.
- Screwdrivers.
- Power drill.
- Pliers, especially ChannelLocks (large and
adjustable).
- Steel file—a round one is a good choice for the inside
surfaces, but you can live with just about anything.
- Aluminum shears (optional—I ended up needing them, but
you probably won’t)
- Friend who works in a machine shop. My friend Eric Quinlan and his
co-worker Ed were able to cut out one slot in the tube
which I wanted, as well as drill two holes that were too
big for my power drill, and cut the saber tip and upper PVC
assembly to match exactly. Eric was also kind enough to
de-burr the top end of the saber. (Eric has a Web site here.) Note that
you can build the saber, and even cut the required slots,
without requiring the work of a machinist.
- Patient spouse
who understands—or at least overlooks—these obsessions.
- A large C-clamp or vice (not vital, but you’ll be glad to
have one).
- Soldering iron and solder (only if you include the
electronics).
- A little bit of time and patience.
|


